A deep dive into Docker

Docker is a great straight forward way of using containerization. I’m a big fan, and use Docker to pretty much use Docker to run most of my lab.
Refer to the Table of Contents if you are looking for something specific about Docker.
What is Docker?
The brand Docker has become synonymous with containers like Kleenex is to tissues. The reason for Docker’s popularity is it makes running containers a whole streamlined ecosystem. While lots of really cool virtualization technology is taking place behind the scenes, the user’s experience is straight forward. Write a docker compose file which has all your components, point to an image on dockerhub to use for a baseline, tell it what ports it can use, and fire it up. Docker is great, but why do we even use containers? While this Docker guide isn’t meant to be an explanation of containers in general, let’s make sure we’re clear on the basics.
Most people know how a physical computer works. It has CPU, RAM, Storage, other hardware, and an operating system. Virtual machines take this concept further by installing something called a Hypervisor. Hypervisors can be classified in two forms. They can either be installed directly onto the hardware as you would an operating system, we call these baremetal hypervisors or type 1. VMWare’s ESXi or Proxmox would be example’s of a type 1 hypervisor. Or they can be installed on top of the operating system which we call type 2. VMWare’s VirtualBox is an example of a type 2 hypervisor. From these hypervisors you are able to allocate a fraction of your real physical resources to create a virtual machine.
In this sense a Virtual Machine is a complete emulation of a physical machine. It virtualizes everything right down to the hardware creating virtual cpus, virtual storage devices, a virtual network card, and everything else a computer needs to exist. Obviously this can be very taxing on resources since you have to virtualize so much. This is what brought about the necessity for containers.
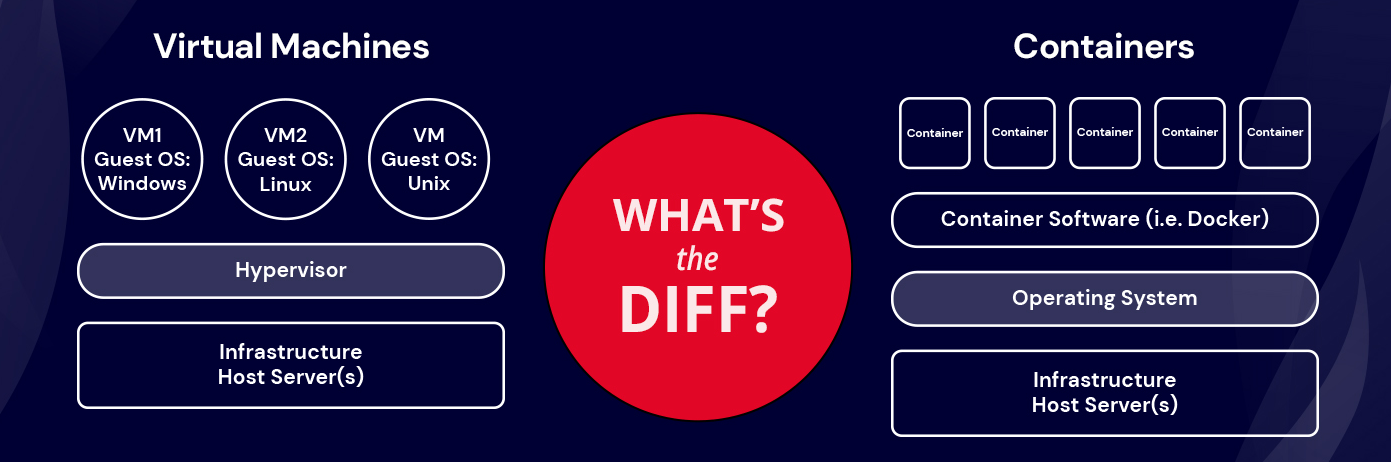
If virtual machines virtualize the hardware of physical machines then containers could be thought of as virtualizing an operating system. Containers are extremely lightweight, can start instantly, and have a footprint of mere Megabytes compared to Virtual Machines Gigabytes. Containers are able to perform this by sharing the operating system kernel. In other words, linux containers can only exist on a linux host, and windows containers can only exist on a windows host. The advantage here is you can then package a linux application with the bare minimum it takes to run, and it will run on any linux machine. Docker is a great and easy way of managing this container ecosystem.
If further understanding of virtualization is necessary this video goes into good concepts of not only what VMs and containers are but how the need for them developed. This need is first and foremost resource utilization. It’s easier to see once you jump into it. The next section is installing Docker.
One last note on virtualization. We don’t live in a world where we have to choose between virtual machines and containers. Use both! The great thing about these two technologies is they work well together. If you create a virtual machine and then install docker onto it and run containers, you can then use the hypervisor to take snapshots of the VM and have full control over the environment docker is installed on.
Setup
This is a How-to guide on setting up Docker on Ubuntu Linux.
These commands are taken directly from Docker documentation and explained for your convenience.
Uninstall old docker versions to start fresh
1
 sudo apt-get remove docker docker-engine docker.io containerd runc
Add Docker’s GPG key to your machine. This acts as a signature for the docker repo and lets your machine know to trust it. It also provides encryption during the file transfer process.
1
 curl -fsSL https://download.docker.com/linux/ubuntu/gpg | sudo gpg --dearmor -o /usr/share/keyrings/docker-archive-keyring.gpg
Next, use the following series of commands to send a script block to the terminal which points to the public GPG key that is now on the machine and tells the apt package manager to include the docker repository as a 3rd party trusted repo.
1
2
3
 echo \
   "deb [arch=$(dpkg --print-architecture) signed-by=/usr/share/keyrings/docker-archive-keyring.gpg] https://download.docker.com/linux/ubuntu \
   $(lsb_release -cs) stable" | sudo tee /etc/apt/sources.list.d/docker.list > /dev/null
Update the apt package index to include the new docker repo and install docker along with its engine and docker compose.
1
 sudo apt update
1
sudo apt install docker-ce docker-ce-cli containerd.io docker-compose-plugin
Verify docker is working as intended by running the test docker image.
1
 sudo docker run hello-world
Add your current logged in user to the Docker linux group which has permissions equivalent to root for editing file systems for your containers. (If this group is missing you can use
sudo groupadd docker)1
sudo usermod -aG docker $USER
You can verify it worked by logging back in using
su -- usernamethen trying to run docker without sudo now.1
docker run hello-world
On ubuntu Docker is added to start automatically but on other distributions you may need to use systemd the default system manager of most linux machines.
1
 sudo systemctl enable docker.service
1
 sudo systemctl enable containerd.service
By default docker creates log files which can grow in size infinitely slowly taking away system resources. We correct this by adding log rotation. Either create or edit the file
/etc/docker/daemon.jsonwhich is what controls daemon settings for docker. Add the following lines to setup log rotation with a max amount of 3 files at 50MB a piece before overwriting. We are also specifying that the log output should be in json. The JSON format annotates each line with its origin (stdout or stderr) and its timestamp. Each log file contains information about only one container.
1
2
3
4
5
6
7
    {
      "log-driver": "json-file",
      "log-opts": {
        "max-size": "50m",
        "max-file": "3"
      }
    }
Usage
Docker has a couple terms you should be familiar with:
- DockerHub: The official Docker repository of premade images.
- Image: The lightweight OS and dependencies downloaded from DockerHub which are needed for an application.
- Bind: Docker images will often reference a port or a file directory inside and outside the container. For example “80:8080” in docker speak would be a bind for port 80 on the host to port 8080 inside the container.
- Docker Compose: While you can run a single container by executing commands and referencing an image, you can also create a series of instructions for running one or many containers. This is called a compose file. Compose files are really the best way to re-use your images and containers.
Let’s take a look at a docker-compose.yml file which can be used to create a self-hosted dashboard website called Homerr.
1
2
3
4
5
6
7
8
9
10
11
12
13
version: "2"
services:
  homer:
      image: b4bz/homer
      container_name: homer
      volumes:
        - /home/lucyadmin/docker/config/homer:/www/assets
      ports:
        - 8092:8080
      #environment:
      #  - UID=1000
      #  - GID=1000
      restart: unless-stopped
Let’s break down this compose file:
Version: "2"- You will see versioning in a lot of Docker compose files but this is a deprecated practice. I used this as an example.Services:- specify what services are running in your compose stack.homer:- the container we are going to be using.image: b4bz/homer- this tells the compose file where to download the image file from DockerHubcontainer_name:- specify name the container will be referenced by from now onvolumes:- Docker uses volumes to store its data. For simplicity we use binds here./home/lucyadmin/homer:www/assets- This bind is saying the files that are located in /home/lucyadmin/homer are mounted inside the container at the location www/assets.ports:- We can specify what ports are outside the container8092:8080- Here we are saying port 8092 on the host machine is bound to 8080 inside the containerUID/GUID:- You can typically specify in a compose file which user or group will have permissions over the files written into the volumes.restart: unless-stopped- Ensures docker container is started upon reboot of the host machine.
We launch a docker compose stack by creating the yml file and launching it with the compose up command. The -d portion stands for detached and it makes it so the compose stack runs in the background in its own terminal.
1
docker compose up -d
You now should be able to access your server by going to the hostname:portnumber in your web browser.
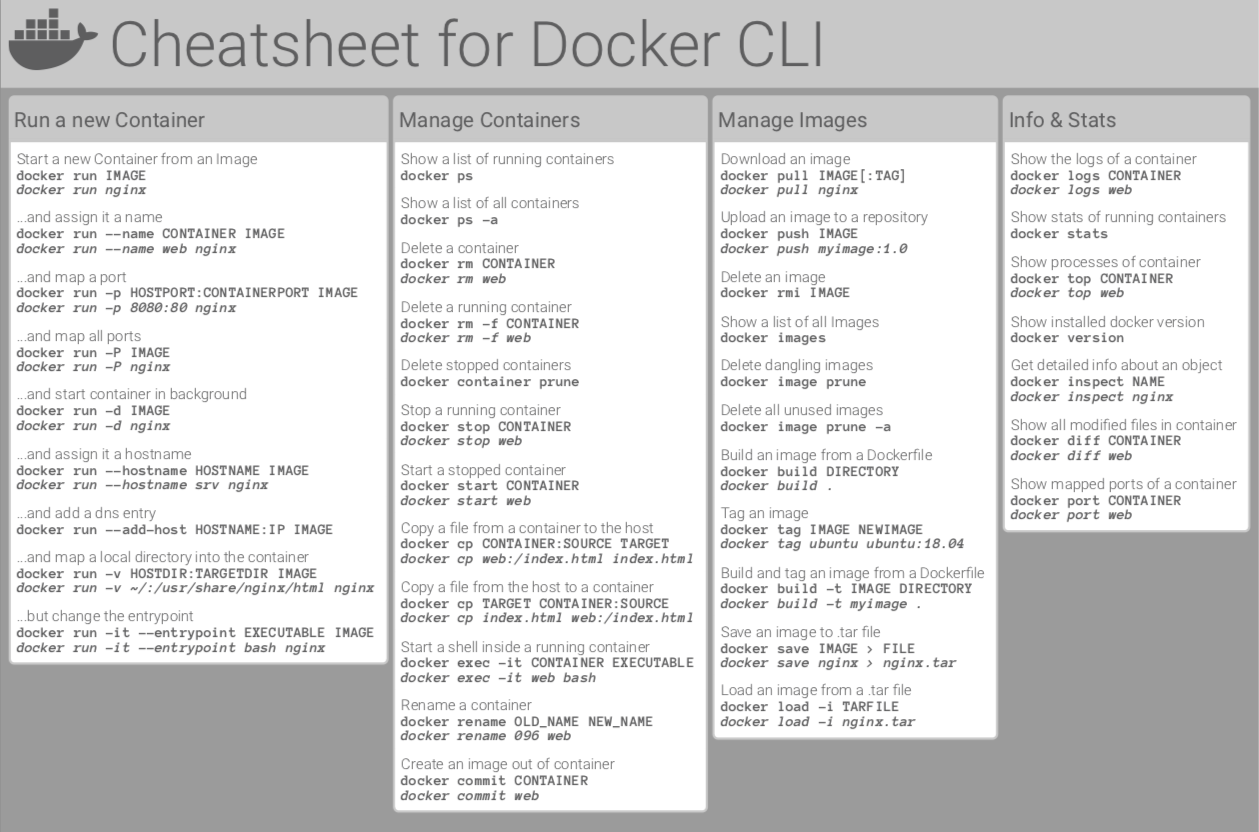
This is using compose, however you can use Docker directly to spin up containers too. Here are some general Docker use commands.
Running containers
Use the run command to start a new container from an image:
1
docker run nginx
assign it a name:
1
docker run --name web nginx # web is the name and nginx the container
map a port:
1
2
docker run -p HOSTPORT:CONTAINERPORT IMAGE
docker run -p 8080:80 nginx
run the container as a background process:
1
docker run -d nginx
assign it a hostname:
1
docker run --hostname svr01 nginx
add a dns entry:
1
docker run --add-host HOSTNAME:IP IMAGE
map a local directory into the container:
1
2
docker run -v HOSTDIR:TARGETDIR IMAGE
docker -v ~/:/usr/share/nginx/html nginx
Managing containers
list containers:
1
2
docker ps # show running containers
docker ps -a # show all containers
delete a container:
1
docker rm containername # you can add -f if container is running to force
start/stop a running container:
1
2
docker stop containername
docker start containername
copy file between docker:
1
2
docker cp containername:filename filename # docker to host
docker cp filename containername:filename # host to docker
rename a container:
1
docker rename oldname newname
start shell inside container:
1
docker exec -it containername bash
Managing images
download an image:
1
docker pull imagename
delete an image:
1
docker rmi imagename
list all images:
1
docker images
Informational and Utility
check version of docker:
1
docker version
show stats of running containers:
1
docker stats
show processes of a container:
1
docker top containername
show mapped ports of a container:
1
docker port containername
Docker logging
Configuring docker logs
By default docker creates log files which can grow in size infinitely slowly taking away system resources. We correct this by adding log rotation. Either create or edit the file /etc/docker/daemon.json which is what controls daemon settings for docker. Add the following lines to setup log rotation with a max amount of 3 files at 50MB a piece before overwriting. We are also specifying that the log output should be in json. The JSON format annotates each line with its origin (stdout or stderr) and its timestamp. Each log file contains information about only one container.
1
2
3
4
5
6
7
{
  "log-driver": "json-file",
  "log-opts": {
    "max-size": "50m",
    "max-file": "3"
  }
}
Docker log location
If you come across an issue where you need to delve into Docker logs they can be located on the host where the container is running. First obtain your docker container ID, then look for the log found here:
1
/var/lib/docker/containers/<containerid>
Using log commands
list all running containers, use the docker ps command.
1
docker ps
Then, with the docker logs command you can list the logs for a particular container.
1
docker logs <container_id>
Most of the time you’ll end up tailing these logs in real time, or checking the last few logs lines. Using the –follow or -f flag will tail -f (follow) the Docker container logs:
1
docker logs <container_id> -f
The –tail flag will show the last number of log lines you specify:
1
docker logs <container_id> --tail N
The -t or –timestamp flag will show the timestamps of the log lines:
1
docker logs <container_id> -t
The –details flag will show extra details about the log lines:
1
docker logs <container_id> --details
But what if you only want to see specific logs? Luckily, grep works with Docker logs as well.
1
docker logs <container_id> | grep pattern
This command will only show errors:
1
docker logs <container_id> | grep -i error
Once an application starts growing, you tend to start using Docker Compose. Don’t worry, it has a logs command as well.
1
docker compose logs
This will display the logs from all services in the application defined in the Docker Compose configuration file.
Cheat Sheet